

How To Create A New Disk On Windows 10
There are hundreds of bug that can happen in a Windows computer. Each user might accept his or her own stance on which 1 is the worst but for is here in WindowsTechies , the problem that we consider to be the worst is losing all files later on the whole organisation is corrupted past a strong malware or virus.
This can fifty-fifty get worse towards the next level of being worse if the files that you've long treasured and protected in your Windows machine cannot be recovered anymore. All of united states have experienced this after a reformat or clean install process has been done on our laptops and PCs only footling do people know that Microsoft actually created tools for protecting users from ever suffering the worst nightmare that can happen anytime.
We take shown the tools that are available in Windows 10 that will help you prepare for the worst in our previous tutorials. They are called the System Recovery and System Paradigm/Backup and Restore tools and if you have read them, yous should have encountered a department where we mentioned about "drive partitions" . Yeah! in social club to fully take reward of these tools, y'all will need to at to the lowest degree be able to create one bulldoze partition which volition serve equally the storage for your fill-in or system image files.
But how are hard drive partitions created? What are the steps involved? If you wanted to follow the steps that we've shown in our previous tutorial but you stopped in the middle considering you don't have a hard drive division/external hard drive with you then y'all we'll assist you create one (drive sectionalisation) with at least fourscore GB of storage space. Merely follow the steps that we are going to testify in this tutorial in guild to successfully create one difficult drive sectionalisation in your Windows 10 machine .
Accessing the Tool Deejay Management Tool in Windows x
Different tools take unlike means of being accessed on your Windows 10 machine. The same is true with the Disk Management tool that is built within the Windows operating organisation . There are varied means in accessing this handy tool and nosotros're going to bear witness each ane of them in this tutorial.
Launching Disk Management from the Admin/WinX Carte du jour
One of the simplest steps that you tin can use in opening the Disk Management tool is by clicking on its link that is found on the Admin carte also known as the WinX menu . In order to open this tool, all you lot demand to do is press the Windows + Ten keys and the tool will appear instantly on the bottom-right portion of your computer screen as you can see being shown below.

Just after clicking on the link, the Disk Direction tool should launch almost instantly and y'all should exist able to come across all available hard disk drives on it that you can create partitions from.
Accessing Disk Management from the Command Panel
At present, if y'all honey doing things the traditional fashion then you tin can access the Disk Management tool from the Control Panel . If y'all are having trouble finding the shortcut or link that will launch the Control Console Window then yous don't demand to panic about it being lost or unavailable because all y'all need to practice is to one again admission the WinX menu as we accept shown above. Just press the Windows + X keys and the menu should appear instantly on the bottom-left portion of the screen. From here, merely click on the link that says "Control Console" and the traditional settings department of Windows should open right away.

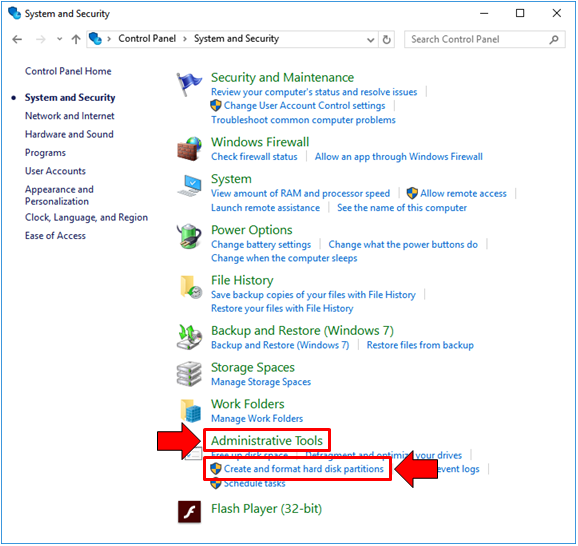
Now, on the Home screen of the Control Panel Window, just click on the category that says "Organisation and Security" equally you can run into on the screenshot below.

Later clicking on the category, you should be able to access the section which shows its contents and from here, you will need to click on the subcategory that says "Administrative Tools" in instance you yet desire to explore some other stuff that are bachelor under it or you lot may also open up the "Deejay Manager" tool right away by clicking on the "Create and format hard deejay partitions" link plant under the "Administrative Tools" subcategory.
In case you chose to click on the former (Administrative Tools category) , you lot volition be taken to a Window that looks exactly like the ane being shown below. As you tin see, there is a long list of tools listed in alphabetical order simply if you don't want to stress yourself much then you can simply click the latter (Create and format disk partitions) pick as described earlier. The screenshot below shows the "Computer Direction" tool shortcut which you need to double-click in gild to access the "Disk Director" tool.
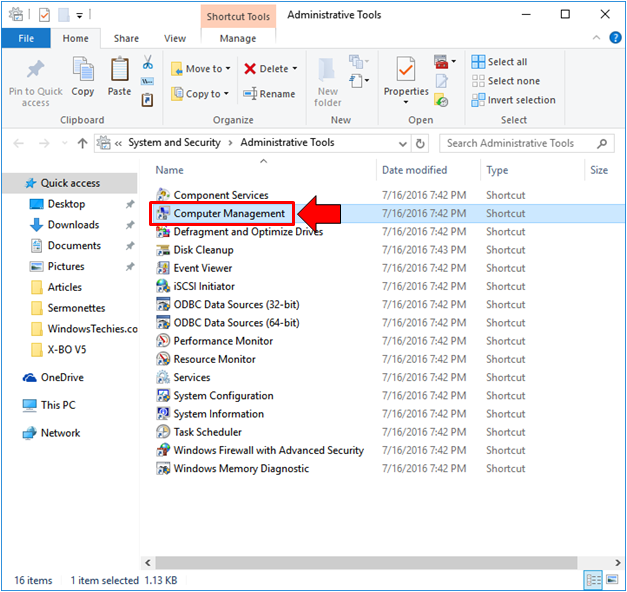
The Computer Direction Window will then launch and in here, you volition see the usual setup of a Window where there is a navigation pane at the left containing links or shortcuts that leads to the different tools that are used to manage your motorcar. From this pane, you'll need to click on the shortcut that says "Deejay Management" and voila! The tool should open on the aforementioned Window right afterwards it initializes.

Launching Disk Management from the Universal Settings App
Lastly, we volition come to another easy method in launching Device Management tool and in order to do so, you will commencement demand to open up the universal Settings app . In order to do this quickly, all you need to do is press the Windows + I keys and the Settings app Window should open up in an instant!

One time the universal Settings app opens, you lot volition be able to see 9 setting categories but this time, we will not be clicking on whatever of them. Yous volition but need to focus on the Search box that is plant on the height-center portion and in here, y'all will simple demand to type the words "disk management" . Subsequently typing in these couple of words, you should be able to see the "Create and format hard disk partitions" shortcut appearing as a search effect/proposition but below the input box equally you lot can run across on the screenshot below.

After yous click on the search result suggestion equally we have shown above, the Disk Management tool should launch almost instantly and you will now exist prepare to create a difficult drive partition which we will be talking about adjacent!
How to Create a Hard Bulldoze Partition
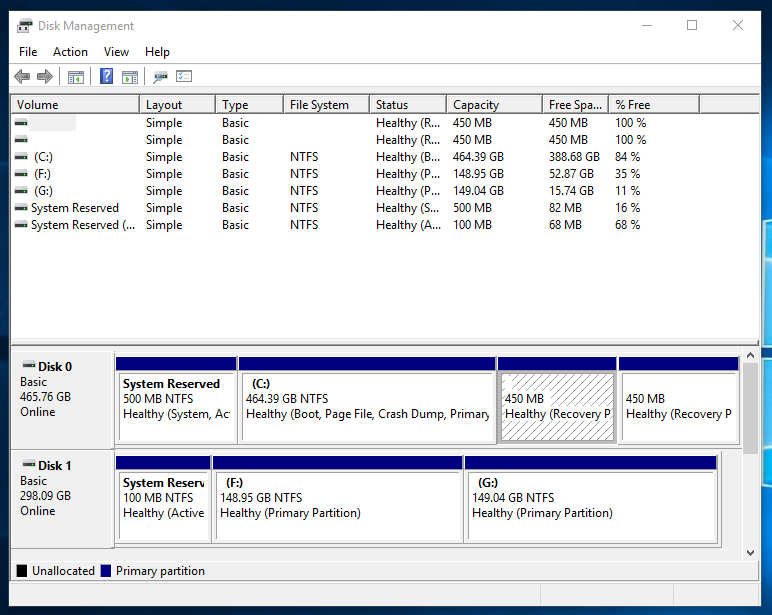
In one of our previous tutorials, we've shown how to create a Organisation Image also known as a backup in Windows 10 and it required a difficult bulldoze partition that has at to the lowest degree 100GB of space and then in this tutorial, we will be showing you how to create a division that has this amount of storage space in it. To start, you will first need to know the drive letter of your machine's hard bulldoze. It is designated equally bulldoze C: if you oasis't inverse the drive letter and if you only have a single partition where the operating system is installed.
To start, you will need to look into the lesser portion where the label "Disk 0" is found and to the right of it, simply look for the box that is labeled "(C:)" as you lot tin run across being highlighted on the screenshot beneath.

After finding bulldoze (C:) , all you need to practice is right-click on it in order to access a contextual menu which shows the different options that yous tin can do to the drive. Since we are trying to create a new hard drive sectionalization, what we'll need to click is the option that says "Compress Volume" as shown beneath.

After clicking the shrink volume option, the Deejay Management wizard volition show a prompt that says "Querying volume for available deejay space, please wait…" . This would just take a few seconds and after it is done verifying the bachelor space, the "Shrink C:" wizard will open up showing the available size before shrink, total size bachelor for shrinking and there's a box below it where you can enter the space that you want to create for the new hard drive segmentation. Since we want to create one that has 100 GB of storage space, all we need to do is enter 100000 into the box since it asks the size in MB.

After inbound the infinite desired for the hd partition that will exist created, you lot can now click on the button that says "Shrink" institute at the bottom-correct portion equally you tin can see on the screenshot above. Later you practise so, the tool; volition apply the shrinking of your existing drive and one time it is done, you should be able to see a new box under "Disk 0" which has a blackness bar above it and is labeled "Unallocated" and the space is not really 100 GB . Information technology is just 97.66 GB since a few megabytes were used for required system files for information technology to be created.

If you lot check in File Explorer for the bachelor drives, y'all will not be able to encounter this space yet since it still has to be formatted so it can exist used. However, bulldoze C: should take already been shrinked and the available space in it is already smaller or less 100 GB since Disk Management has already separated that space from the drive.
Formatting the Unallocated Space
At present that you've successfully separated a total of 100 GB from the existing drive (Drive C:) you volition at present need to format information technology so it volition appear as a new partition when you lot check for the bachelor drives in File Explorer . To outset, you will first need to correct-click on the unallocated space shown in the Disk Management tool Window in order to admission a contextual carte which shows the options and actions that are bachelor for the drive. From these options, you will need to click on "New Elementary Volume…" every bit shown beneath.

After clicking on it, the New Simple Volume Wizard will instantly launch and from here, just click on the "Adjacent" push button which is found on the bottom-right portion of the Window as shown on the screenshot beneath.

The next footstep will so ask you to enter the desired amount for the new elementary volume that is going to be created. The full amount of infinite is already in the box by default but if you desire to enter a smaller space value so feel free to do and so by entering it into the input box then subsequently, just click on the "Side by side" push that is plant at the bottom-right portion.

Next, you will be asked to assign a drive alphabetic character or path. Since we are but creating a basic partition, you don't demand to change anything on this Window. The new bulldoze will exist labeled as "D:" by default but you can modify this to other letters of the alphabet except C: since it is already existence used by the existing drive. To cull a new drive letter, just click on the driblet-down box which contains the default ane assigned to the drive every bit you can see on the screenshot below and choose the one that y'all want.

Subsequently choosing your desired drive letter, all you need to do is once again click on the "Next" button that is establish at the lesser-right portion of the Window in order to continue to the adjacent pace.
The Window that comes next will then enquire y'all to format the division. Again, the default options that are selected already works keen so just click on the "Next" button that is located at the bottom-right portion of this Window to initiate the formatting of the drive.

Finally, you will come to the concluding footstep which shows the information that you have set and selected in the previous steps. You tin bank check these settings for the new drive in club to make sure that everything is what you actually want to create and after making certain that everything is expert, simply click on the push button that says "Terminate" equally you can encounter on the screenshot below.

After clicking on the "Finish" button, the bulldoze will so exist created and you should be able to use information technology right after. In other cases, you may need to reboot your computer in order to make the changes concluding and we would recommend that you practise so in order to arrange everything well for the newly created bulldoze.
Why Create a Hard Drive Sectionalisation?
Dividing your hard bulldoze to unlike parts is a good thing to do especially if you are trying to protect some stuff from being corrupted along with your electric current or existing hard drive space where the operating system is installed on. You can likewise create a hard drive sectionalization to be mapped equally a network drive in instance you don't similar other people to be able to access your personal stuff that might exist stored in folders and libraries that are shared by default when you map your existing drive on a network.
Other cases that warrant the creation of a separate difficult drive partition is when y'all want to save a system image or a backup drive for your estimator which y'all can utilise in case things gets worst and your machine refuses to boot up normally as we accept shown in this previous tutorial . Have you always tried creating a hard bulldoze partition on your Windows 10 automobile ? What sort of problems did you meet and how were y'all able to solve it? You might want to allow us know your thoughts and so we can help you with it. Our community of Windows-loving earthlings might also have some suggestions that volition help solve the problem that you are having on your computer.
We are as well open for any topic suggestions. If you have some questions running in your mind about Windows or you want to solve a problem and you lot didn't discover a tutorial in our website that shows how it could be solved so please feel free to submit information technology as a topic suggestion to us by taking advantage of the comments section beneath.
Source: http://windowstechies.com/create-hard-drive-partitions-windows-10/
Posted by: porteryouss1994.blogspot.com
0 Response to "How To Create A New Disk On Windows 10"
Post a Comment